Posts

Building the W8NX Short Trap Dipole

Image
  Building the W8NX Short Trap Dipole Filed in Antennas on May.31, 2021 For the past five years, I have been operating the lower bands (30, 40 and 80 meters) with a trap dipole that was modeled after a web article written by John DeGood NU3E. [1] While the antenna performed well, a monsoon storm last summer beat it up enough that the antenna wire broke at the center balun. So I climbed the tower and lowered the remains of the antenna to the ground for repairs. On closer examination, I discovered that the relentless Arizona sun had taken its toll on the traps. The insulation on the exposed ends of the coax had rotted away. They were still working, but would need to be rebuilt and weatherized to insure good operation many years into the future. Since I was going to have to rebuild the antenna, I started thinking about whether this antenna met my current needs and wishes. I had been wanting to get on 160 meters at this QTH for some time, but my small back yard w...

Rebuilding the 80-40-30 Meter Trap Dipole

Image
  Rebuilding the 80-40-30 Meter Trap Dipole Filed in Antennas on May.31, 2021 After more than 5 years of operation, one of the antenna leads on my homebrew 80-40-30 Meter Dipole broke at the center balun connection. This dipole has served me well, allowing me to easily utilize those lower HF bands. While I did not use 30 meters much, it was nice being able to go there when I wanted to. I climbed the tower and lowered the entire antenna to the ground. Once I was back in the shack, a quick look made it obvious that I needed to better weatherize the traps. The sun had pretty much destroyed the exposed inner conductor of the coax on the inside of the trap forms. With this in mind, I went about rebuilding the traps with new coax.   Trap Test Setup with NanaVNA Before rebuilding the traps, I set up the NanoVNA to check the resonant frequency of the traps by confguring it to measure loss through the trap. Sweeping the frequency through the trap showed ...

B&W Antenna Switch Repair

Image
  B&W Antenna Switch Repair Filed in Accessories on May.10, 2021 Some time in the past, I have picked up several of the B&W Antenna Switches at a hamfest. They were purchased at a good price, just $10 each, and appear to be of pretty good quality. I got two 6-position switches (B&W Model 595), and two 3-position switches (B&W Model 593). Last month, I decided to put them to use in my remodeled hamshack. So I dug them out of the parts bins, and gave them a quick multimeter test. One of the 6-position switches had a problem with the grounding arrangements for unused connections. As they are switched from antenna to antenna, they are supposed to put a ground on all connections except the one currently in use. This switch was not doing that.   B&W 595 Antenna Switch as Received I opened up the switch and did a visual inspection. I found that the switch contact for the common ground connection had been irretrievably burned, su...

Kenwood SW-2000 Wattmeter Lamp Replacement

Image
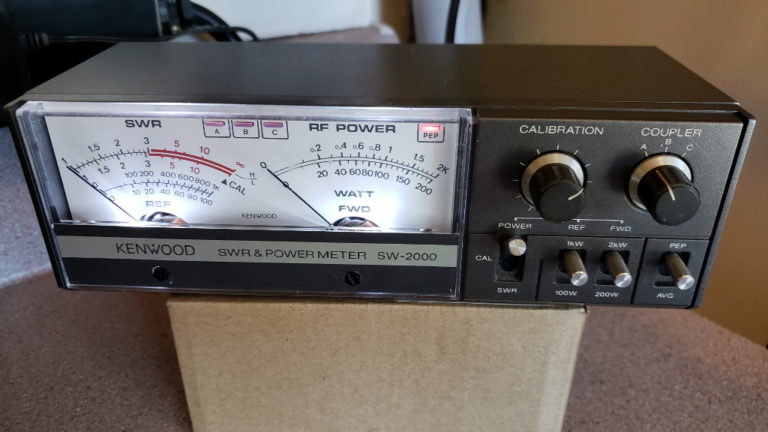
  Kenwood SW-2000 Wattmeter Lamp Replacement Filed in Wattmeters on Mar.28, 2021 I’ve been busy lately rewiring my hamshack. In the process, I have been doing some minor repairs to equipment that has deteriorated over the years. My Station Wattmeter, a Kenwood SW-2000 that I bought new in 1983, had long ago burned out its incandescent bulbs for the meters. So it is time to replace them with some new LED bulbs.   The job was not as easy as I had hoped. I removed the metal cover by removing four screws on the sides and one screw at the back top, near the center of the meter. Be careful, as the two front screws that attach the case to the meter place have captured nuts that may fall out. To get access to the light bulbs, the front cover plate for the meters must be removed. The screws are hidden under the product label at the bottom of the cover plate. The label is glued on, so it must be carefully be peeled off of the faceplate, hopefully keeping it i...

3018 CNC for PCB Milling?

Image
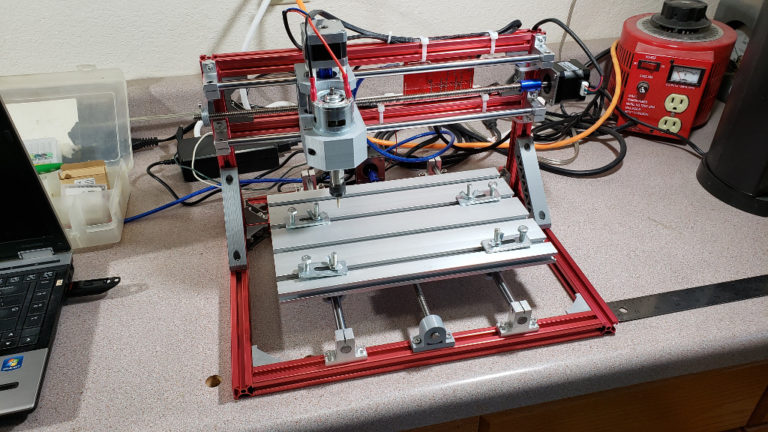
  3018 CNC for PCB Milling? Filed in CNC on Aug.05, 2020 I have started learning how to mill PCB boards using a benchtop CNC Router.   3018 CNC Assemble In the past, I have used a chemical etching method to create custom PCBs for some of my projects. While it was generally successful, there were some problems with the process. It was messy. Storing and mixing the chemicals used in the etching process inevitably led to some splashing of the chemicals on clothing, workbenches and other items of value. This was especially a problem when the Ferric Chloride solution was used, as it stained everything it touched. Using a muriatic acid/hydrogen peroxide solution was cleaner, but still problematic. Disposal of the chemicals was a problem. Even after heavy dilution, one worries about the environmental effects of the waste chemical disposal. After etching, the chemicals had an added quantity of copper. That complicates things. Until very recently, the c...