ERC-4 Interface & My HyGain Ham-IV Rotator Controller – Part 2
ERC-4 Interface & My HyGain Ham-IV Rotator Controller – Part 2
Checkout
[ ] Connect 11 – 15 vdc to the barrel power connector. The center contact is positive, the outside is negative.
[ ] Place the Jumper on JP1
[ ] Measure your input voltage (11 – 15vcc) at the +12V test point to ground
[ ] Measure +5vdc +/- 0.2v at the test point +5V to ground
[ ] If all is well, you may remove power from the board, and install IC1 & IC2 into their sockets. *** Pin 1 is top-left on both chips***
This usually requires the pins of the ICs to be straightened, as they tend to arrive bowed out too wide for the sockets. I just use a flat surface (my bench top) and lay one side of the IC against the surface at about a 45 degree angle, pressing gently to bend the legs in slightly. Then I repeat for the legs on the other side of the IC.
Be careful inserting the ICs, it is easy to miss a pin and bend it. That usually doesn’t end well.

Configuration
[ ] Apply power to the ERC board again
[ ] Plug the USB-B connector into the ERC Board
[ ] Plug the USB-A connector into your computer
You should get the distinctive ding sound of the system detecting a new USB device being plugged in.
[ ] Install the USB Driver, if your computer asks you to. It is included on the installation CD
I already had a driver installed, so did not need to do this.
[ ] Check your computer for a newly active com port.
On windows computers, you may use Device Manager to do this. Looking at the com ports section, you can plug/unplug the USB cable and see which com port goes away and returns. Take note of the com port number. In my case it is Com8.

[ ] Install the Service Tool from the CD by starting the setup file setup_ERC-M_Vxx.exe
Mine was setup_ERC-M_V33.exe, which I already had installed.
[ ] Follow the setup instructions in the program to finish installation
I already had the program installed from my previous ERC, so I did not need to do this.
[ ] Start the Service Tool by double clicking on its icon.
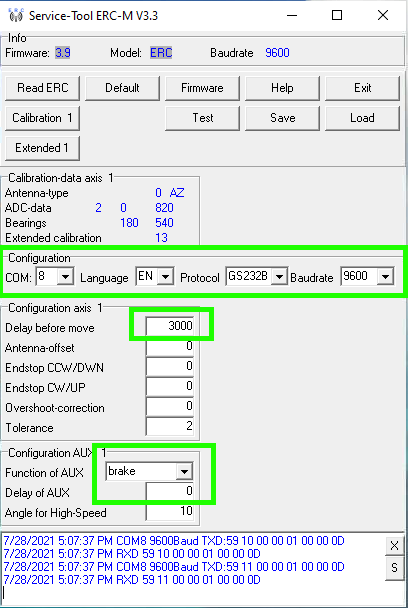
[ ] Set your com port to match the one detected when you plugged the USB cable in the steps above.
[ ] If successful, you should see the tool reading some parameters from the ERC board.
[ ] Run a hardware test by pressing the TEST button in the Service Tool
You should hear relays clicking a few times each time you do this.
[ ] Read the ERC Parameters by clicking the READ ERC Button.
[ ] Set your language, if necessary, in the Language box.
[ ] Set your Protocol to GS232B.
[ ] Set your Baudrate to 9600.
[ ] Configure your AUX relay to the “Brake” function.
[ ] Set Delay of AUX to 0.
This will make it such that the release of the brake is nearly immediate.
[ ] Set Delay Before Move to 3000
This will cause the controller to wait 3 seconds for the Brake to release before attempting to move the rotator.
At this point, you can save your config to a file for future retrieval, in case something goes wrong. You do this by pressing the save button, and providing a path and filename to save the file.


Comments
Post a Comment