ANSRTrack - Deploy to Linux: Part 3
ANSRTrack - Deploy to Linux: Part 3
Distribution via AppImage
To this point, we have identified all of the libraries to be distributed with the executable file in order to distribute a folder containing everything necessary to run on most reasonably up to date versions of linux. We also discovered the folder arrangement necessary to make this work. We put everything together in a package that allowed us to copy the program to a computer which does not have Qt installed on it, and were successful in running in the new environment.
Next, we will try to use a distribution method called an AppImage to distribute the program.
An AppImage is a container (kind of like a compressed folder) that contains many of the same files as our “manual” folder transfer method that we got working. The advantage of the AppImage is that the user can just copy this one file anywhere on their linux machine and expect it to work with minimal changes. I’ve read that it works very much like apps on an Apple machine.
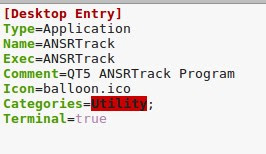
An AppImage will require something called a desktop file. This is a text file that has entries to describe the program. I copied the following entries into a text fie and saved it with the ANSRTrack name. The linux system recognizes it as a desktop configuration file.
First, we must place all of our files in a directory structure called an AppDir. The program that creates the AppImage expects the files to be in a very specific order within a holding folder (the AppDir). This structure was copied from the actual AppImage file that is used to create new AppImages.
Many of the folders are empty, and could probably be removed or left out, but I haven’t experimented with that yet. But the ones that contain files must be in the structure shown below. Notice that the only different or new files are the desktop configuration file and the AppRun file. You can get the AppRun file from the AppImage.org website. They are generic in nature and don’t need to be modified.
- ANSRTrack.AppDir – directory
- ANSRTrack – Desktop Configuration File
- AppRun – a standard file that loads the Application and runs it
- balloon.png – an icon file
- usr – a directory to hold files for the program
- bin – directory to hold binary executable
- ANSRTrack – the program executable
- platforms – a directory to hold the platform plugin lib
- libqxcb.so – shared platform library
- lib – directory to hold library files
- libcudata.so.56 – shared library file
- libcui18n.so.56 – shared library file
- libcuuc.so.56 – shared library file
- libQt5Core.so.5 – shared library file
- libQt5DBus.so.5 – shared library file
- libQt5Gui.so.5 – shared library file
- libQt5Positioning.so.5 – shared library file
- libQt5SerialPort.so.5 – shared library file
- libQt5Widgets.so.5 – shared library file
- libQt5XcbQpa.so.5 – shared library file
- local – directory
- bin – directory
- balloon.png – icon file
- bin – directory
- share – directory
- applications – directory
- doc – directory
- icons – directory
- hicolor – directory
- 16×16 – directory
- 22×22 – directory
- 24×24 – directory
- 32×32 – directory
- apps – directory
- scalable – directory
- hicolor – directory
- locale – directory
- man – directory
- menu – directory
- mime – directory
- pixmaps – directory
- bin – directory to hold binary executable

Once the directory AppDir has been populated, you have to run a program called appimagetool, from the AppImage.org website to create your AppImage of your program. The website says that this can be run as a Gui interface, but it never showed anything when I double clicked on it, so I ran it from the terminal window as follows:
cd to the directory containing the appimagetool file, and from there, run:
./appimagetool -n <path to AppDir>
substituting the <path to AppDir with the actual path. In my example…
./appimagetool -n /home/rdpecken/AppDirs/ANSRTrack_0_1.AppDir
If all was good, it will create the new AppImage file.

Before you actually run this file, you have to make sure it is marked as executable. I like to use chmod 775 ANSRTrack-x86_64.AppImage
But the Gui should work too…

And double clicking on the file runs the program…

To test the distribution system, I used a second linux machine that I have here which does not have Qt installed on it. In addition, I made flash drives containing several versions of linux that I booted to on two different machines. So far it seems to work on the following systems:
- Linux Mint 18
- Linux Mint 19
- Ubuntu 16
- Ubuntu 18
- Debian 9.08
- elementaryos 5.0
Some linux versions were not successful:
- Linux Mint (32 bit) – wrong architecture
- Ubuntu 14 – too old
- archlinux – I didn’t have a Desktop version
- Centos 7 – The LiveUSB wanted to install rather than just run
- dsl (damn small linux) – wrong architecture
- openSUSE – The LiveUSB wanted to install rather than just run
- puppylinux – would not boot
I suspect that if I compiled in a 32 bit environment, it would run on 32-bit versions. I also believe it would run on Centos and OpenSUSE if I had the OS installed. I didn’t want to do full installations. I just wanted to run from USB for testing.
So all in all, it took a lot of experimenting, but once I found the right directory structure, it appears to be a viable distribution method. Probably the easiest method from the end user standpoint.


Comments
Post a Comment