Arduino/SD Card Reader – Part 2
Arduino/SD Card Reader – Part 2
The next test with the SD Card Readers was with a simple program to create a file, write data to it, and read the data back out. This was the ReadWrite example program included in the Arduino IDE. The only change I made was to specify pin 10 for the Slave Select Pin, rather than pin 4.
This is only the part of the example that I changed. The total example file is included with the Arduino IDE.
// Adafruit SD Adapter uses pin 10 for Card Select
if (!SD.begin(10)) {
Serial.println("initialization failed!");
while (1);
}
Running this program on both the Adafruit and the Catalex SD Card Reader modules worked perfectly.

Next, I ran the ListFiles Example program, changing the SS pin as appropriate…
This program simply list all files in the root directory of the SD Card. Both SD Card Readers worked fine…

Next in line was the Files program. This program simply creates and deletes files from the SD Card. Both readers succeeded…

The next example program tested was the DumpFile program. I created a text file on my laptop and stored it on the SD card. Placing the SD Card into the Arduino SD Card Reader and running the program opens the specified file and prints the contents to the serial monitor. Both card readers worked with this.

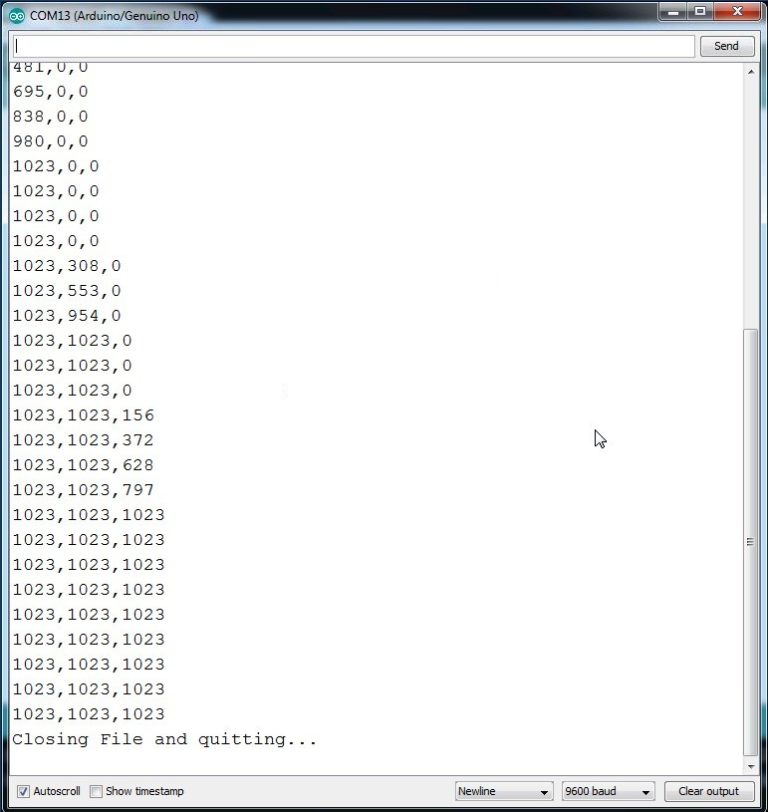
The final test was to build a datalogger that reads the position of 3 potentiometers and write those values onto a file on the SD Card. First I wired up the circuit as described in the program source, using SS pin 10 for the card select pin.

Notice that I added a switch on the right hand side of the picture. I ran into a little trouble with running the card readers with the constant writing, opening and closing the file as fast as it would go. I thought it would be good to put a kill switch in the circuit and add some code to the example to gracefully stop writing and close the file, rather than just powering off the circuit.
The problem I had was that when I powered off the circuit, it must have been in the middle of a write, and it corrupted the sd card. I had to reformat it on my laptop before starting again.
The other problem was that the program would sometimes have a difficult time initializing the card on the first pass, but only when the code in the loop was set to run fast! It seems that before the card gets initialized, it has already jumped into the loop and started running there, or something to that effect.
So I put a little delay (anything 20ms or greater worked) in the loop to slow down the writes to the card. That made everything stable. I could start the code running, push the kill switch to stop it, and hit the reset switch on the Uno board to restart it. Each time, it appended new reads to the bottom of the file.
Here is the code I ended up with:
/*
SD card datalogger

This example shows how to log data from three analog sensors
to an SD card using the SD library.

The circuit:
* analog sensors on analog ins 0, 1, and 2
* Kill Switch is on Digital input pin 2, configured as a pullup input
* Pull it to ground to stop saving
* SD card attached to SPI bus as follows:
** MOSI - pin 11
** MISO - pin 12
** CLK - pin 13
** CS - pin 4 (for MKRZero SD: SDCARD_SS_PIN)

created 24 Nov 2010
modified 9 Apr 2012
by Tom Igoe
modified 11 Jan 2018
by Randy Peckenpaugh

This example code is in the public domain.

*/

#include <SPI.h>
#include <SD.h>

const int chipSelect = 10; // card select pin for SD Card Reader
const int killSwitch = 2; // ground this pin to quit writing to sd card
const int waitTime = 100; // delay time to prevent overwhelming card reader

void setup() {
pinMode(killSwitch, INPUT_PULLUP); // Make kill switch pin a pullup, ground it to stop process

// Open serial communications and wait for port to open:
Serial.begin(9600);
while (!Serial) {
; // wait for serial port to connect. Needed for native USB port only
}

Serial.print("Initializing SD card...");

// see if the card is present and can be initialized:
if (!SD.begin(chipSelect)) {
Serial.println("Card failed, or not present");
// don't do anything more:
while (1);
}
Serial.println("card initialized.");
}

void loop() {
// make a string for assembling the data to log:
String dataString = "";

// read three sensors and append to the string:
for (int analogPin = 0; analogPin < 3; analogPin++) {
int sensor = analogRead(analogPin);
dataString += String(sensor);
if (analogPin < 2) {
dataString += ",";
}
}

// open the file. note that only one file can be open at a time,
// so you have to close this one before opening another.
File dataFile = SD.open("datalog.txt", FILE_WRITE);

// if the file is available, write to it:
if (dataFile) {
dataFile.println(dataString);
dataFile.close();
// print to the serial port too:
Serial.println(dataString);
}
// if the file isn't open, pop up an error:
else {
Serial.println("error opening datalog.txt");
}

// Check the kill switch - If Low, stop writing and hang on a loop
int killMe = digitalRead(killSwitch);
if (killMe == LOW) {
// Close the file and loop here forever...
Serial.println("Closing File and quitting...");
dataFile.close();
while(1);
}
// Slow it down, card can only go so fast...
delay(waitTime);
}


Comments
Post a Comment