Heathkit C3 Capacitance Checker Evaluation
Heathkit C3 Capacitance Checker Evaluation
In my previous post, I mentioned that the previous owner of the C3 Capacitance Checker had indicated that it had been rebuilt, and that it works. I decided to take a look inside to see what had been done before powering it up on the bench for evaluation.

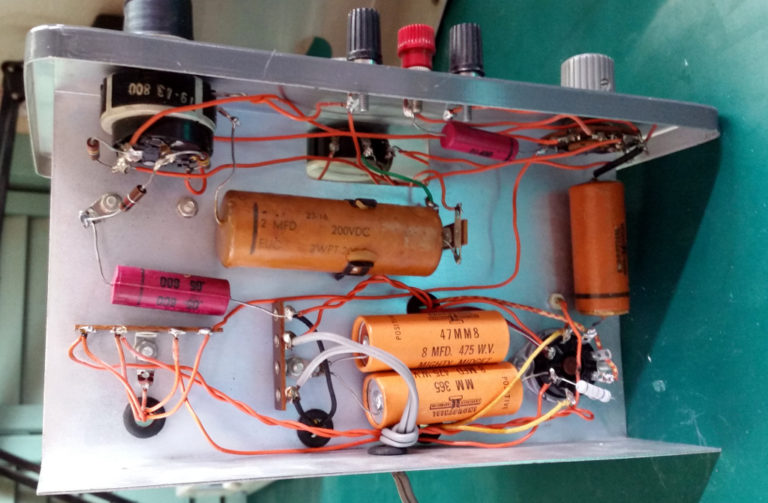
I’m glad I took a look, as it appears that all of the original capacitors are still in place in the unit. I measured all of the capacitors in place. None appeared to be shorted, and all except the 2 uf were actually pretty close to the marked values…
0.01 uf = 0.010 uf
0.02 uf = 0.024 uf
0.05 uf = 0.057 uf
0.25 uf = 0.307 uf
2.00 uf = 0.660 uf, 2.46 ohms ESR
8.00 uf = 12.84 uf, 1.09 ohms ESR
8.00 uf = 12.97 uf, 0.94 ohms ESR
The only real suspicious ones were the two 8 uf electrolytic caps, which were reading about 12 uf, and the 2 uf, which was reading 0.6 uf. I’ll still replace most of them (especially the electrolytics and wax paper caps), but they had held up far better than I expected. Of course, I have no way of testing leakage yet, as that is the goal of this project.
Next, I measured all of the resistors in the tester. Again, most were in good shape, with just a few outside of a 5% tolerance. I had to pull one leg of the 90K ohm precision resistor to get a good reading on it, as other circuitry was causing it to read as nearly a short. I haven’t traced out the circuit to see why that is so.
| Nominal | Actual | |
| 1000 ohm | 974 ohm | |
| 2000 ohm precision | 2.02k | |
| 10k ohm | 10.37k | |
| 22k ohm | 21.04k | |
| 22k ohm | 22.19k | |
| 22k ohm | 20.43k | |
| 22k ohm | 21.43k | |
| 22k ohm | 23.23k | |
| 47k ohm | 46.4k | |
| 90k ohm precision (2x180k) | 90.2k | |
| 200k ohm precision | 202.1k | |
| 220k ohm | 207.7k | |
| 470k ohm | 421k | |
| 1M ohm | 1.007M | |
| 10M ohm | 9.87M |
The good news is that the precision resistors were very close to nominal. This is good, because those values are hard to come by now. I will replace the resistors that are out of tolerance with new 1-watt metal oxide resistors.
Since there were no obvious failures to this point, I decided to slowly power up the tester on my variac. First I wanted to check the transformer, as if it was bad, the tester would not be worth the trouble of refurbishment. I pulled the 1626 triode and the 1629 eye tube to minimize effect on the transformer. Then I measured the AC voltage on the three windings.
With 120vac input to the unit, I read the following…
Yellow – Yellow : 14.4 vac
Green – Green: 64.6 vac
Red – Red/Yellow: 566 vac
So it looks like the transformer is good!
After turning the unit off and inserting the two tube, I brought the voltage up again. It was now time to check the DC voltages of the power supply.
With 115 vac applied, I read the following voltages:
Pin 8 of the 1626 tube: +226.6 vdc (a little high, should be about +150 vdc)
Pin 1 of the 1626 tube: -367.5 vdc (a little low, should be -410 vdc)
Pin 3 of the 1629 tube: +159.6 vdc ( high, should be +80 vdc)
These voltages were not so far out of line that I thought it dangerous to operate, so I continued with testing.
I tested some capacitors and found that the calibration for the value is off by quite a bit on both small and large caps.
| Nominal | Actual | |
| 0.10 uf | 0.05 uf | |
| 22 uf | 10 uf | |
| 47 uf | 34 uf | |
| 100 uf | 72 uf | |
| 470 uf | 220 uf |
Next, I tested the leakage test voltage at the banana jacks on the bottom of the front panel. These voltage were off quite a bit from the expected value, as well.
| Setting | Measured | |
| 25 v | 39.36 v | |
| 150 v | 129.3 v | |
| 250 v | 212.4 v | |
| 350 v | 291.4 v | |
| 450 v | 376.8 v |
I also tested the unit in Resistance mode with a 47 K resistor. It read about half of the correct value.
So there are a few things to wring out with the unit. I’ve placed an order with justradios.com for the capacitors and some resistors. I’ve also ordered a safety capacitor to replace the 0.5 uf going from the line to ground. I’d hate to have that short out and put the chassis at line potential.
Finally, two of the knobs cannot be tightened enough, as they are cracked. I’ll have to find a way to repair them, as well.

I’ll post again when I make the parts replacements and do further testing.


Comments
Post a Comment