HW-16 Dial Repair – Part 3
HW-16 Dial Repair – Part 3
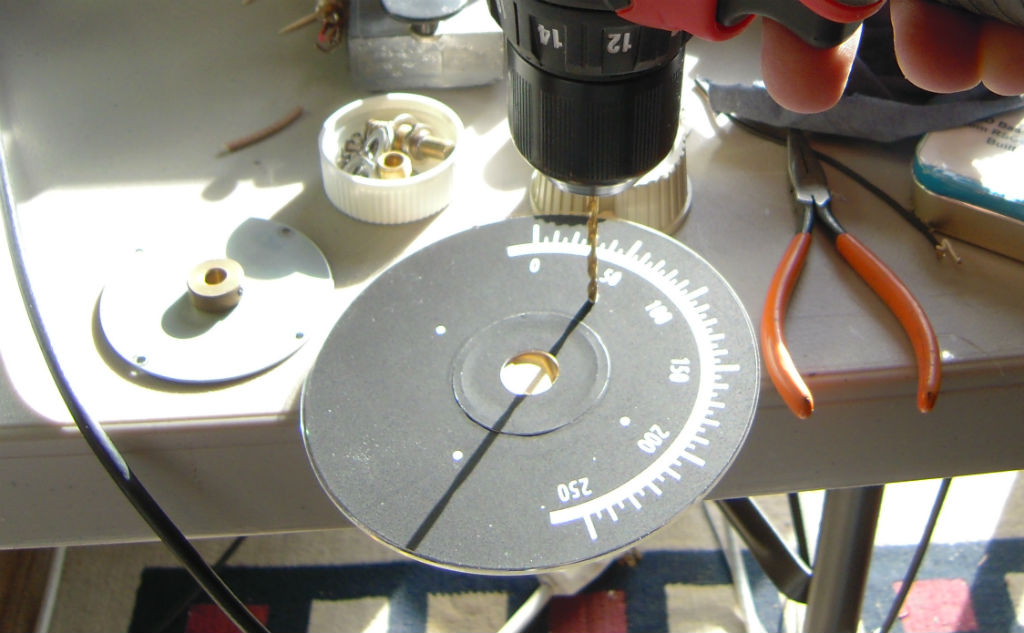
OK, so now I had a translucent disk with a new dial label applied. Now I needed to mount the disk to the mounting plate for the HW-16. It turns out that this is harder than it sounds. I expected some trouble drilling the holes through the polycarbonate disks. But that turned out to be really easy.
While drilling the holes was pretty easy, getting them in the right location was more difficult. I had put circles on the label to indicate where they were on the original dial, but there was just a bit of inaccuracy in a couple of the holes. So when I mounted the plate, it was off center.
I installed the disk like that, but it wasn’t long before I discovered two things: First, by being off center, the disk was tight on one end of the scale and loose on the other, causing it to disengage from the drive mechanism periodically. Second, the drive mechanism was just to tight for the slightly thicker dial made from the old CD.
I tackled the first problem by enlarging the holes from 1/8″ to 9/32″. That allowed enough slack to be able to adjust the position of the disk slightly before tightening down the screws. So I was able to get it pretty much centered.
Oh, I also noticed that a previous owner had mounted the plate on the wrong side of the dial, as well. That is now fixed.
Now, on to the second problem. Not only was the dial drive not consistently engaging on the thicker dial, but it felt like the drive assembly itself was galled, sticking and roughly operating. I noticed that there were a couple of retainer clips holding the pieces together. I have to admit, that the first time I took this apart, I reacquainted myself with why these are sometimes referred to as “Jesus” clips.
After taking this apart, I burnished the brass surfaces and added just a bit of grease to the shaft. Upon reassembly, the drive was silky smooth, and easy to operate again. To engage the thicker disk, I found a rubber grommet with the right size interior hole and slot around the outside. I added that to the drive mechanism, and mounted it to the radio chassis again. Now the drive works fine, and the tuning as nice and smooth. I have detected no slippage, yet, but can keep an eye out for it. If I do get some noticeable slippage, I can use some kind of glue to keep the grommet from rotating around the drive mechanism. Or maybe just mount it tighter to the dial…
Next steps… Fix the meter.
HW-16_Dial_600dpi_combined.odg
HW-16_Dial_600dpi_combined.pdf
Migrated Comments:


May 7th, 2018 at 11:05 am
This is simply brilliant. I make dials for the HW, and some other HK’s.
I recognize the amount of work you have put into this product and
applaud your finished product. As you portray and it is a lot more
work and trial and error to get a good finished product. Great work
and a great finished product!
Kevin
KD0ILM
June 5th, 2020 at 6:23 am
Great job on the dial reproduction. I used your pdf file copy of the dial. I printed a copy of the dial then scanned it so I could use it with NCH DISETCH software to enlarge the dial so it fit the entire OD of the CD.
I didn’t use sand paper to remove the aluminum coating. I used a RED DEVIL single edge razor blade. I made a light cut across the aluminum coating then scraped the coating off. It came off really easy. I cleaned the CD to ensure all the coating was removed. I found removing the coating on DVD’s to be more difficult but removing the coating on CD’s is very easy and quick, about 5 minutes start to finish.
I printed a couple of dials on paper then compared the dial against Avery circle sticky labels. Once I had the dial right I printed dial and applied the dial to the sticky label using Avery label applicator.
I agree with you, it’s not easy to get the mounting holes right. Since the HW-16 dial is the same OD of an HW-100/101 dial and has the same mounting holes in the exact same place on the inner portion of the dial, I used a spare HW-101 dial by “eye balling” the dial on the HW-101 dial. I made the marks for the mounting holes and drilled the holes. I was lucky, all 4 holes came out right. The dial was mounted on the mounting plate and the capacitor. I used your method of rotating the dial, a rubber gromet over the tuning assembly. Works great. Here’s a link to my HW-16 with the reproduction dial
https://w5rkl.com/wp-content/uploads/2020/05/Front-view-1-1536×1152.jpg
Thanks for your help, I was able to make an HW-16 dial out of a used CD.
73
Mike W5RKL
https://www.w5rkl.com
June 5th, 2020 at 8:03 am
Thanks for the report, Mike. Your HW-16 in the photo looks great! enjoy reading your exploits on the Heathkit groups.io sites (and previously on yahoo groups). Keep up the good work.
73 de Randy wb0smx