My “New” TS-430
My “New” TS-430
With all of the electrical fixes finished on the TS-430, I felt kind of sad when I looked at it. 30 years of hauling around in various mobile installations, and field day operations have taken their toll. I decided to give the old girl a facelift.
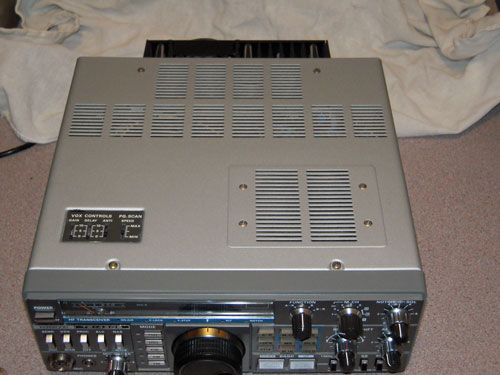
Here are some “before” shots of the case. Like a said, pretty beat up…
Side of top...
I started by dis-assembly. Taking the front cover off was a little tricky, because the tuning knob really sticks tight. We happened to have a cold spell in Arizona, and this time when I tried, it pulled right off. After that the rest of the knobs came right off, allowing me to remove the front panel. The top and bottom clamshell covers just have screws holding them on.
Once disassembled, I pounded out the dents using a hammer as an anvil, and a second hammer as a, well, hammer…
Next, I used some 600 grit sandpaper to sand out the various nicks and scratches, followed by 1000-grit wet sandpaper to prepare it for paint.
I did not do anything to the face of the faceplate, as it was still in good condition. But I did sand out the nicks on the edges of the faceplate.
I went to a local auto-paint store called New Age Auto Paints, on Country Club Drive in Mesa. The folks there helped me match the color of the original paint, and mixed up a batch for the case. We didn’t do a separate custom color for the faceplate. Instead, I picked out a color from the stock colors at Ace Hardware. That was a mistake…
Next, I masked off the areas not to be painted, and put two coats of Rust-Oleum Painter’s Touch Ultra-Cover 2x primer on the rest. After drying for 24 hours, I wet-sanded the primer in preparation for the paint.
I was debating at this point whether to even use paint. The primer looked really good.
I then applied 2 coats of the semi-custom mix to the case halves. When I put the second color on the faceplate, I found that the store obviously had the wrong color of cap on the spray paint. It came out a very bright chrome color. So I had to strip that down and start over.
Altogether, I think I have about 6 coats of paint on the case and faceplate. It seems really durable now, and looks great.
The color chosen for the faceplate lip is Rust-Oleum Painter’s Touch Ultra-Cover 2x Satin Granite. It turned out really nice. It’s like having a new rig!
Migrated Comments:


February 11th, 2013 at 8:04 pm
Looks Great!!!!
March 7th, 2016 at 10:34 pm
How much of the front panel/bezel did you paint. I couldn’t tell from the PIX where the masking stopped. At the front edge, the inside of step or the back edge of the step. Anyway looks like new!
March 8th, 2016 at 7:57 am
I painted the front panel bezel all the way up to the front edge. So I had masked the very front of the panel (the face where the writing/labels for the controls is), and painted the outside edge of bezel, along with the step.
Thanks for your comments! – Randy WB0SMX
December 15th, 2018 at 12:20 am
Randy, That is a absolutely beautiful restoration – I am restoring a TS850, I have 2 spray cans I bought many years ago from Martin Tippin when he was selling them on ebay, it is the proper shade of gray fine metallic, but has a little too much gloss, the factory finish has very little, between satin and flat…..Is yours like that?…I remember the 430 and 440 were more silver and lighter than the later 450/850/950 Gray Metallic
December 15th, 2018 at 8:52 am
Thanks, Donald. I think mine turned out really close to the original finish as far as color and “shininess”. It may be just a touch brighter (more toward silver) than the original, but I would have a hard time telling unless it was sitting next to an original fresh out of the box…
Thanks & 73… Randy wb0smx