Boxing up the MMR-40 – Part 2
Boxing up the MMR-40 – Part 2
Once the faceplate was started, I went on fitting it to the front of the radio. It’s a little short on the sides, as the CB face was just a little longer than 6″, and I didn’t want to waste a bigger piece of pc board on this. It will look fine in the end…

Fitting the Faceplate
I used my pocketknife to trim down the little bumps around all of the holes in the old faceplate. This will allow the new faceplate to sit flush on a flat surface.

Bumps Shaved Off
Next, I went to work cutting out the various holes that would be necessary for the controls to fit through the old faceplate. While I was working on it, it became apparent that there was a thin sheet of aluminum covering the old faceplate. This had to be removed, as it was loose, and I didn’t want the new faceplate to lift off of the face. I just grabbed it with pliers and pulled it off. It was just glued on…
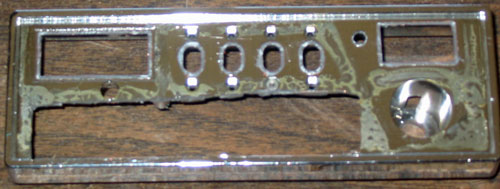
Aluminum Sheet removed
The CB chassis wasn’t very stiff after removing the old circuit board, so I needed something to replace it and stiffen the assembly up. I used a piece of perfboard that I had laying around. It was very easy to cut to size and mount in the chassis. This will provide a platform on which the MMR-40 circuit board will be mounted.

Perfboard Installed
So the MMR-40 should sit about like this when all is done, with it’s controls sticking out holes in the new faceplate. Top view…

top View
And front view…

Front View
I’m working on getting the KD1JV digital dial installed to the front panel. It will go where the old channel indicator was. When I have more progress, I’ll post again.


Comments
Post a Comment