Building the K7QO Noise Source (Manhattan Style)
Building the K7QO Noise Source (Manhattan Style)
In an earlier post, I had need for a noise source to evaluate a circuit in the MMR-40 40-meter transceiver.
I had chosen the K7QO design that was based on an RSGB circuit. On
that occasion, I had built it on a breadboard, and modified it to work
down to audio frequencies.
I decided that it needed to be more permanent, so I returned to the original design, and built it up manhattan style. Manhattan Style uses small pads of circuit board which are glued to a ground plane and used to support the non-ground parts of the circuit. I added a small bit of circuitry to include an on/off switch and indicator; and put it all in an altoids tin. So here is the process…

Finished Noise Source
Here is the schematic diagram of the circuit as built…

K7QO Modified Noise Generator Schematic
Construction started by measuring the altoids tin to see how much room I had to build the circuit.

Measuring the case
The dimensions turned out to be roughly 3-1/2″ x 2″ (close enough for our purposes)…
The dimensions were transferred onto a scrap piece of circuit board to form the base.

Transferring the cut lines
Next, the base was cut out with a cheap rotary tool from Harbor Freight (my good dremel tool is up at the ranch). Note the use of eye protection…

Cut out the base
Then the base was trial fitted to the case. The corners needed to be rounded a little to fit…

Marking the corners
The corners aren’t as clean as I would have liked, but I’m getting a little lazy in my advanced age…

Base Fit into case
Next, I started the metalwork on the case by marking the location of the bnc connector on the side.

Laying out the case
A small pilot hole was drilled for the BNC…

Pilot Hole
I like to use the small unibit to drill the final hole in the thin tin of these cans. They make nice, smooth holes with no dents or burs…

Unibit
Once all of the holes were drilled in the case, work continued by punching out the manhattan pads from a piece of circuit board.
Here is the tool that I use to do this…

Harbor Freight Punch
I use the 1/4″ die to cut the pads. Some prefer smaller (1/8″) and some prefer larger.

Punch Size
And using the punch is as easy as feeding the circuit board in, and squeezing with your hand. I should mention that the thicker the board material, the more work you have to do. I don’t really see any reason to use heavy board material for the pads, but sometimes that might be what you have on hand. I stick with the thin, cheap stuff.

Punching Pads
And here is what you end up with… Nice small little circles of circuit board. They get glued to the ground plane circuit board, copper side up, to provide a place to solder components to.

Pads
So next, I started to glue down the pads, and build the circuit. About half way through, I noticed that I had failed to leave room for the 9-volt battery to sit. So I had to de-solder the parts from the circuit, and use pliers to twist the pads off to start over. Thats’s what the mess in the lower right is all about. No serious harm, just not as pretty as it could be.

Building the circuit
Once the circuit was built and tested, it was placed in the case, and the external parts connected (LED, BNC, Switch).

Circuit Built and working
Next, I used Visio to draw some labels for the Noise Generator.
Visio is very good at printing exactly the size that you ask for.
The labels were attached to the top…

Top Label
And the bottom of the case…
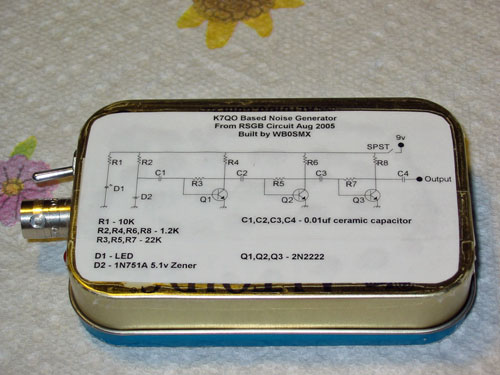
Bottom Label
The Noise Generator creates a broadband noise from well below 1.8 mhz to well above 30 mhz. On my TS-480 transceiver, the S-meter reads about S9 +20db signal. It is useful for aligning filters and any frequency dependent circuits.
Migrated Comments:
3 Responses to “Building the K7QO Noise Source (Manhattan Style)”


July 19th, 2010 at 12:58 pm
Thanks for posting.just built this and it looks and works great.
June 11th, 2013 at 1:09 am
KI6UMT Nice little noise generator. Thanks. I duplicated using a pad diamond drill with the same finished results you had. Don’t have visio but PCPaint was good enough.
January 21st, 2015 at 8:14 am
Hi, Just built this and it works great. I just used square pads, cut with a dremmel and glued them down, Thanks for posting
Regards Ray Koster G7BHQ