Field Day Preps… HF Doublet Construction
Field Day Preps… HF Doublet Construction
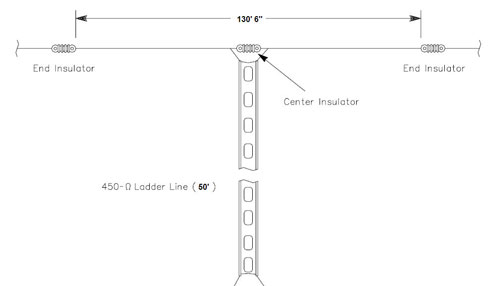
Once the two end masts were in place, we moved inside to construct the doublet antenna. The basic design comes very close to the design at hamuniverse.com
It is basically an 80-meter dipole fed by a length of 450 ohm ladder line into a balanced antenna tuner.
It was quite an adventure gathering the parts for this antenna project. I first looked at the website for Ham Radio Outlet (HRO),
which has a local store in Phoenix. I was getting short on time, so
needed to get something together quick before field day arrived.
The HRO Website showed a Van Gordon All band doublet for sale at $44.95,
which was a great deal. They showed that it was in stock, but didn't
indicate at which store. In addition, I was looking for a balanced
antenna tuner to go with it, the MFJ-974H model from MFJ Enterprises. This also showed in stock on the day before I visited the local store.
So I didn't call the store, knowing that if they didn't have the Van Gordon antenna, I could probably pick up the pieces to make my own version. I arrived at the store the next afternoon, and asked about the antenna tuner. It was not in stock, and they did not show any in stock at any of their stores. They did have the B model in stock, but it didn't cover 160 meters. OK, so I might have to use my old MFJ-949B with the built in 4:1 balun instead.
I asked about the Van Gordon antenna, and it was also not in stock. So I ended up purchasing two 75' lengths of stranded antenna wire, a WA1FFL Ladder-Lok center support insulator, 100' of 450 ohm ladder line, and two plastic end insulators. Total price: $75.00! I told you the Van Gordon was a great deal!
When I got home, I called Amateur Electronic Supply (AES) in Las Vegas. They had the MFJ-974H in stock, and could ship it normal UPS for $9.00 and have it arrive in time for field day. I ordered it, and the package arrived on late Wednesday, just as they said it would. So now I had all the parts, here is how it went together
We started by constructing the center insulator/support. This device acts as a strain relief for the 450 ohm ladder line, so that it will not easily break from the flexing that occurs as the wind blows antennas around.
After securing the ladder line into the shell, we made about a 3-inch loop in the ends of the dipole through the center insulator supports
Then we stripped and attached the ladder line to the dipole ands as the manufacturer recommended in this picture
Next we took the whole assembly outside to measure the dipole halves. John carefully unrolled the wire, to avoid kinks
We pulled the wire tight, along with the tape measure, and cut each wire at 65' 6". We allowed the extra 6" to give us a good size loop on the end of the wire to go through the end insulators. The length is not critical, from everything I have read, though. So when that was finished, we had this
The next post shows how we installed this to the masts.
Migrated Comments:
2 Responses to “Field Day Preps… HF Doublet Construction”


August 17th, 2012 at 3:35 am
I use a 6:1 balun and a short length of coax between the 450 Ohm balanced feeder and the atu. It works very well indeed on 10 to 80 metres … 73 de Tony (EI5EM)