Antenna Masts for the Ranch
Antenna Masts for the Ranch
We've been moving along in our construction of the LittleHouse at our Juniper Valley Ranch. I've been wanting to get better communications capabilities established there. Currently, we have to hike down our half mile lane to our drive entrance at Markham Pass in order to get any cellphone communications. However, once a link is established, we can then head back up to the cabin, and are able to complete calls from there, at least sometimes. So the thought is that if we can get a beam antenna up in the air a bit, pointed at a cellphone site, we might be able to have reliable private communications.
Of course, when I think about towers or masts and antennas, I have to think about how I can incorporate ham radio into the mix. I can currently receive some decent vhf/uhf signals from Mingus Mountain, near Prescott, as well as Haulapai Mountain, near Kingman. A high, clear antenna can only help there. And the few times I've set up an HF station on a 40-meter dipole 10 feet off the ground, there was good success with very low noise levels.
So here is the first project towards that goal: A set of three fold down masts to support both private and ham radio antennas at the LittleHouse.

I went old-school on this design, as I had seen an article in the 1964 ARRL Antenna Book which had always intrigued me. The design used dimensional lumber (you know, 2x4s!) to make a fold over mast that reached respectable heights. While it needs to be guyed once it is up, the concept of being able to easily raise and lower the mounting point of the mast is a great feature for someone of my stature!
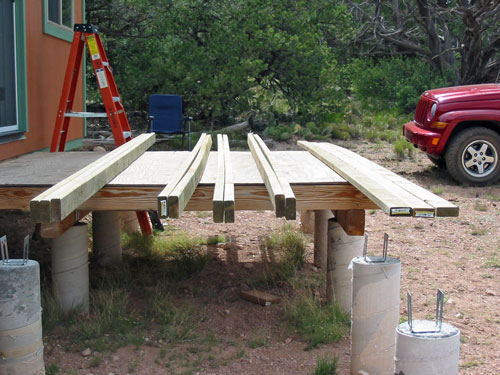
Here is the lumber for all three masts, I sorted them into 3 nice, straight, dry 16 foot pieces for the top section on the left. Then there are three sets of two not so straight 16 foot pieces for the bottom section of the masts. And finally on the right are three pieces which will form the middle of the bottom section. They were cut down to 12 feet in length in order to provide a saddle for the top pieces.
First, I had to decide where to put the three masts. I didn't want the masts or the antennas to dominate the view, so they needed to be far enough from, and preferably in back of the house in order to blend in as well as could be expected. The mast nearest the LittleHouse was placed at the North West corner of the house, near the satellite dish. This will be the center support for the 80-meter dipole, as well as the support for the VHF/UHF/Cellphone antennas.

The end supports of the wire antenna were placed about 70 feet from the center support. This is far enough to support something like an 80-meter dipole. Here is the view toward the center mast, from the west mast site. Just the edge of the tree will be in the way for raising the wire antenna. That should be easy to manipulate around

The third mast was located about 70 feet east of the center mast. Here is the view toward the east mast from the center one. There is kind of a pathway for the wire to pass through while raising it. The little tree can be trimmed to allow the wire to pass freely on the way up

The site for the east mast is fairly clear after passing by the trees mentioned above. The digging was pretty tough there though, due to the limestone formations and cobblestones

Looking back toward the center mast, you can see that if we trim the small trees in the center, there will be room for the wire to pass as we raise it

Actual construction started with the three mast sections. I wanted to get these done early, in order to allow time for the glue to dry before putting any stress on them. I took two 16' 2x4s and sandwiched a 12'² 2x4 between them. Using glue and 10 penny nails, I created a beam with a saddle on the top. Then I took one of the straight 16' 2x4s and placed it into the saddle to form the top section of the mast. It was nailed and glued in the same way

Here is a look at the middle part of the mast that is sandwiched between the outer parts

The full length of the mast is longer than out LittleHouse!

So basically, the idea is to plant some 4x4 pressure treated posts into the ground, with enough room in between them for the fold-over section, which is three 2x4s wide. For each mast, I dug a hole about 12 x 8 inches wide, and 2 feet deep. I placed the two posts, separated by some scrap pieces to hold them the proper width apart. Into the hole also went two 80 lb bags of Ready-Mix concrete. I poured a little concrete, then a little water, and tamped it down around the two posts, checking level in two directions with each pass. The final result, with a little dirt on top, looked like this:

After letting the concrete set overnight, the mast was carried over to the post, and a bolt was slipped through both posts and the mast about 5 feet off the ground. This allows me to use the heavy end as a counterweight to lift the tall end into the air. I can pull it down with one arm, so that was successful

And here is a wider view, to get an idea of the proportions of the mast

Once to top hinge was loosely bolted into place, you just grab the bottom of the mast (wear gloves and watch the pinch point), and pull it down and in between the two posts. Then a bolt is slid through the bottom of the two posts and the mast, and all is tightened down

The fully raised mast looks like this now

And here is the center mast, raised into position

At this point, all three masts were lowered to the ground, ready for final installation of guy wires and antennas. On our next trip up, we will install those final pieces and try it out for the ham radio field day event. Should be fun!


December 26th, 2014 at 8:00 pm
I am looking for details about your product place leave a messages . When I post this , I am looking for more Information . like want you post this with pages !
December 26th, 2014 at 8:01 pm
I like to know long you get set up and you more information .
December 26th, 2014 at 9:32 pm
It takes only a few minutes to lower the antenna when I need to work on it. To put it back up takes a little longer, maybe 10 or 15 minutes, because I have to tie off the guy ropes. It goes up and down quickly.
March 20th, 2018 at 10:06 pm
Hi, what is the total length of the mast from the ground up?
Thank you.
March 21st, 2018 at 7:32 am
Hi Joe. I believe the total height from the ground to the top is about 28 feet. Two 16 foot sections overlapping 4 feet.
June 5th, 2018 at 8:30 am
This is *perfect* for my new HOA-oppressed QTH! I’m planning on building HB9MTN’s H-Pole vertical and need a non-metallic mast about 32′ high. I think I can add another 4′ to your plan (guyed, of course), and my wife will be pleased with a tiltover mast and its wooden appearance. Thanks for sharing this.
http://www.qsl.net/hb9mtn/hb9mtn_h-pole.html
June 5th, 2018 at 9:16 pm
Hi Jim. Hope the mast works out for you. Good luck & 73… Randy wb0xmx